Making Drawer Navigator and a splash screen in your react native app!
Hello developers! Welcome to the very new React Native drawer tutorial. So in this tutorial, we are going to make a react native drawer with the help of React Navigation and we are also going to create a splash screen. Pretty nice, huh? So let's jump right into it!
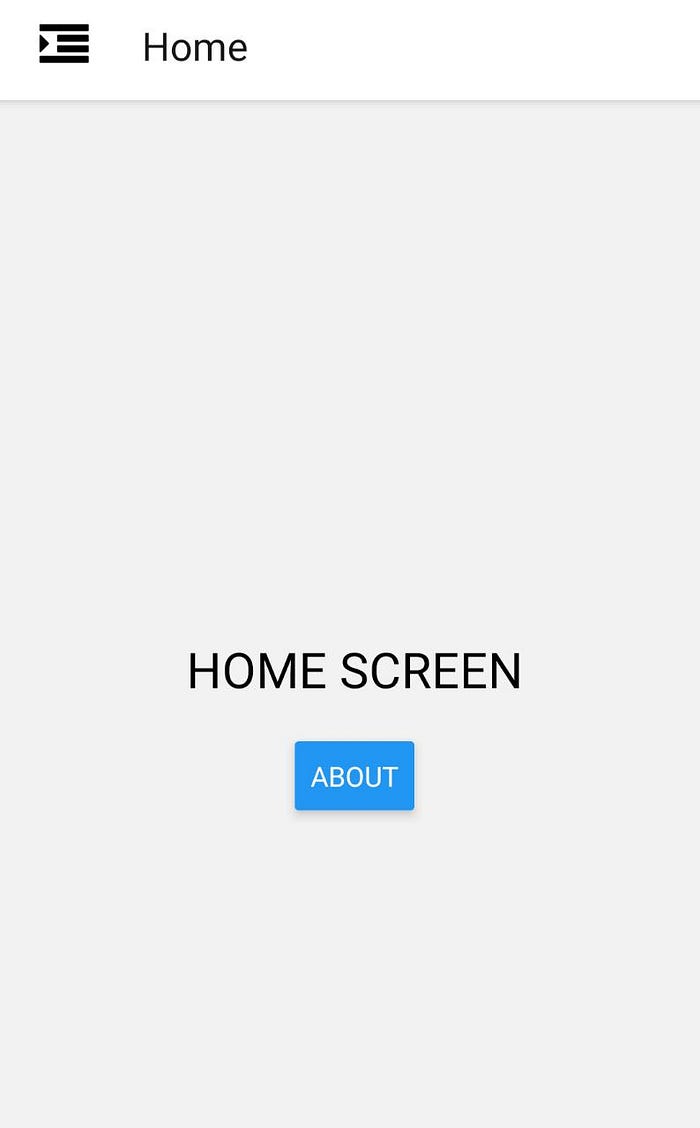
So before writing some code I just wanted to show you what we are actually going to make today so that you may have a brief idea of how things are working out before writing code.

If you directly want to jump to the code you can check out the source code of this tutorial on my Github repo : https://github.com/Rits1272/DrawerNavigation.
So first we need to create a react native project. I will be using react-native-cli here but you can also use expo. So fire up your terminal and write:
react-native init appNext, we will install the dependencies. As said before we will be using React Navigation. React Navigation is basically a standalone library that allows developers to set up the screen and their navigation within few lines of code. You can check out more on react-navigation from here. So in the terminal inside your project directory install the dependencies:
npm i --save react-navigation
npm i --save react-navigation-stack
npm i --save react-navigation-drawer
React-navigation needs some dependencies too as described in the official documentation. So we will install those dependencies:
npm i --save react-native-gesture-handler react-native-reanimated react-native-screens react-native-safe-area-contextNow we need to link these dependencies. So in your terminal:
react-native link react-native-gesture-handler
react-native link react-native-reanimated
react-native link react-native-safe-area-context
react-native link react-native-screens
If you are thinking why we are linking dependencies after installing it is because newly added native modules must be linked because they are out of the “default scope” of the project and in order to be available to the RN platform, they must follow the linking process.
For the hamburger icon of our drawer, we are going to use react-native-vector-icons. So make sure to install it and link it with our app.
npm i --save react-native-vector-icons
react-native link react-native-vector-icons
So after installation, we are ready to write some code. So the navigator that does the magic of creating a drawer in the app in react-navigation is createDrawerNavigator.
In this app we will be creating three screens, one is the Home screen and the other two screens are About screen and Setting screen. We will also be creating a splash screen.
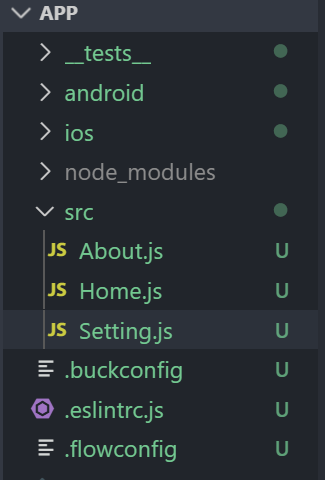
So going step by step first we will first create three screens Home.js, About.js, and Settings.js. So make an “src” folder and under it create the above the three files. Your project directory should look like:
In the Home.js file write the following basic code:
import React, {Component} from 'react';
import {View, Text, StyleSheet, Button} from 'react-native';export default class Home extends Component {static navigationOptions = {
title : "Home"
}render() {
return (
<View style={styles.container}>
<Text style={{fontSize : 25, marginBottom : 20}}>HOME SCREEN</Text><Button
title='About'
onPress = {() => this.props.navigation.navigate('About')}
/></View>
);
}}const styles = StyleSheet.create({
container: {
flex : 1,
justifyContent: 'center',
alignItems: 'center',
},
});
You can copy-paste the same code to the About and Setting screen replacing the name of the class with About and Setting respectively. Now we have three screens for drawer navigation.
We will also make a Splash screen here. So make a file Splash.js inside your src folder and write the following code.
import React, {Component} from 'react';
import {Text, View, StyleSheet} from 'react-native';export default class Splash extends Component {async componentDidMount() {
// You can load api data or any other thing here if you want
const data = await this.navigateToHome();
if (data !== null) {
this.props.navigation.navigate('Home');
}}navigateToHome = async () => {
// Splash screen will remain visible for 2 seconds
const wait = time => new Promise((resolve) => setTimeout(resolve, time));
return wait(2000).then(() => this.props.navigation.navigate('Home'))
};render() {
return (
<View style={styles.container}>
<Text style={{fontSize: 25}}>SPLASH SCREEN</Text>
</View>
);
}}const styles = StyleSheet.create({
container: {
flex: 1,
justifyContent: 'center',
alignItems: 'center',
},
});
In the splash screen basically we are creating a promise. After the promise is resolved we are navigation to the Home Screen. Here you may have noticed that we have used a setTimeout function in which time interval is 2000ms. This time interval determines how much time we want to show the splash screen to the user. Meanwhile, in these 2 seconds you may also load up your API(if any).
Next comes the main part of making the navigation flow in our app. In the App.js file write up the following code:
import React from 'react';
import {TouchableOpacity} from 'react-native';// react-navigation
import {createAppContainer, createSwitchNavigator} from 'react-navigation';
import {createStackNavigator} from 'react-navigation-stack';
import {createDrawerNavigator} from 'react-navigation-drawer';
import Icon from 'react-native-vector-icons/FontAwesome';// importing screens
import Home from './src/Home';
import Setting from './src/Setting';
import About from './src/About';
import Splash from './src/Splash';// Adding Home and About in the same stack allows us to navigate to // About from Home and from Home to About screenconst HomeNavigator = createStackNavigator(
{
'Home': {screen: Home,
navigationOptions: ({navigation}) => ({
headerLeft: () => (
<TouchableOpacity
style={{marginLeft: 20}}
onPress={() => navigation.toggleDrawer()}>
<Icon name="indent" size={25} /></TouchableOpacity>
)})
},
'About': {screen: About}
});// Our second screen in the drawer will be Settingconst SettingNavigator = createStackNavigator(
{
'Setting': {screen: Setting}
},{
defaultNavigationOptions: ({navigation}) => ({
headerLeft: () => (
<TouchableOpacity
style={{marginLeft: 20}}
onPress={() => navigation.toggleDrawer()}>
<Icon name="indent" size={25} />
</TouchableOpacity>
),
}),
});// This navigator makes the drawerconst DrawerNavigator = createDrawerNavigator({
Home: {
navigationOptions: {
drawerLabel: 'Home', // Name shown in the drawer of the screen
},
screen: HomeNavigator,
},Setting: {
navigationOptions: {
drawerLabel: 'Setting',
},
screen: SettingNavigator,
}});// We used createSwitchNavigator because we don't want our user to // navigate back to Splash screen by pressing back button. Hence
// Splash screen just get seen once by the user.const AppSwitchNavigator = createSwitchNavigator({
'Splash' : {screen : Splash},
'Drawer' : {screen : DrawerNavigator}
},
{
initialRouteName : 'Splash' // Telling the navigator that the first       // route is Splash screen
})const App = createAppContainer(AppSwitchNavigator);export default App;
So let us break down this code. First, we created two stacknavigators using createStackNavigator. Our first StackNavigator is “HomeNavigator” and the second one is “SettingNavigator”. StackNavigators, as the name suggests, allows us to create a stack of screens that allows us to navigate between screens easily present in the stack. So as you may have seen in the demo vid shown in the starting that we are navigating from Home to About and from About to Home Screen that is why we added Home Screen and About Screen in the same stack (which is HomeNavigator).
Next, we created SettingNavigator that is just another similar navigator as HomeNavigator. We have not added additional screens in this navigator. But if you want you can easily add more screens.
Now comes the DrawerNavigator. We add all the screens that we want to show in the Drawer. We want to show the Home screen and the Setting screen in the drawer. Therefore we added HomeNavigator and SettingNavigator in our DrawerNavigator.
Finally, we added our Splash Screen. You might be wondering why we have used createSwitchNavigator instead of createStackNavigator. The reason is quite obvious. If we had used StackNavigator then after the user navigates from the Splash screen to the Home screen the user may press the back button and he may get navigated back to the Splash screen and obviously we don't want that. SwitchNavigator prevents this to happen.
Last we created AppContainer for the SwitchNavigator.
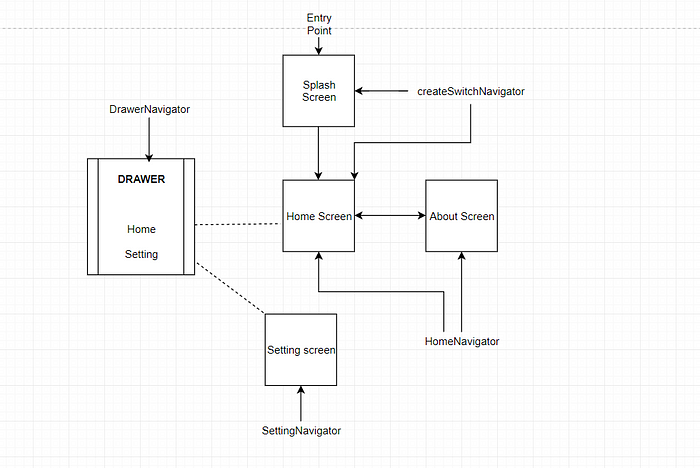
So I have made a bird’s eye view of the navigation flow of our app
I hope you may have understood how to create a drawer and splash screen in your app. Personally, I struggled a lot adding these in one of my apps that’s why I thought of writing this article on helping other fellow developers saving their time.
Thanks a lot! Never forget to put semi-colons ; ). Adios